Video Creator’s Channel Karen C
Hi! Thanks For Checking Out My Video Review
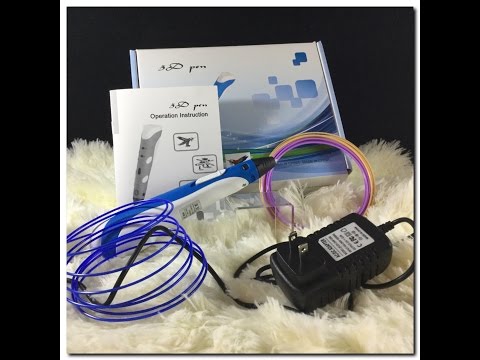
of the tip-top 3d printing pen I want to give you a closer look at this today and show you just how this works so let’s take a look at the pen itself on the very top. We have two indicator lights. Then we have the temperature controller so you can adjust the temperature anywhere between 100 and 62 230 degrees. On this side we have the speed controller so you just simply slide that forward to get to the speed that you want the filament to come out the end and then on this side. You have the adjusters there so you can actually feed the wire coming out or to have it.
If You Want To Remove It From
the pan. Then on the back side. We have the place where the wire goes into so that is the wire. Hole okay let’s go ahead and plug that in now so we can get this heated up so I’m just simply going to plug it into the VM there and as you can see the yellow indicator light came on, so this is now in the preheat status. What you want to do to go ahead and actually turn it on is press the wire feed button and now the light has turned red in about 30 seconds or less it’s going to turn green when it’s fully heated up so well that’s they’re already wet so let’s take a look at what else comes in the box, so you do get three different colors and I think they’re just kind of randomly picked the colors of filament and each one of the filaments is 10 grams per loop.
So Mine Came With Blue And Then
I also got a. lavender and kind of a yellowish orange tannish color. So those are the three that I got and then you also get your instruction guide on how to use everything so the destruction guides very very good. I do like that as you notice I’m doing this over a paper towel. I don’t want it sticking to any of my surfaces and what you need to do now is select the temperature that you want it out by simply sliding this forward or backwards and then you can feed it.
- filament
- pen
- wire
- tip
- preheat
Im Sorry.
You can adjust the speed of it right along here. How fast you want it to come out and then to actually go ahead and get some to come out. You just simply press the feedback so I’m going to do this over the side of this little acrylic stand here and you can hear it making its noise so there that’s coming out as it hits the surface. It’s been a cool and they do recommend that you only use or let kids ate and over actually use this so you can make whatever shape you want and if you want to let something cool.
You Just Simply Let Go For
a second and as it cools it hardens so now I can add on to that shape let that cool a little bit to harden not releasing anything just yet. I’m just letting it harden now. I can come out to just let me hold on to that while it goes so it does cool rather quick so you can get pretty creative with these I’m just doing. This for a demonstration first purposes so that’s kind of the shape we just made and you can see it’s kind of like your glue guns. It gives those little strings on the end, but they come off fairly easily.
Now If I Wanted To Make A Series
of shapes you could do something simple like was just originally doing start it there and then I’ll go over the edge back up and what’s kind of fun too is if you do it fast enough you can kind of mold it a little bit, but I wasn’t fast enough to do that, but as you can see it’s taken that shape on that I had right over the edge, So you can make pretty much anything you want to make whatever shapes letters anything like that you can just go in a circle square triangle pick tree make a dog. Whatever you want to make and just have fun with it So that is how quick and easy it is to use when you’re done you simply just need to unplug it and then if you want to change the filament out press the reverse button and it does come out see it’s. I’m feeding it’s kind of hard to see from there, but it is coming out and now it’s ready for me to switch over to another color. So I haven’t even tried any of the other colors. Yet so let’s try the purple and all you got to do is feed that right into the hole and press the feed button and it does take a little bit of time to get it going now I have the speed I had this beat slowed down.
- wire coming want remove
- unplug want change filament press
- pan place wire
- look pen indicator lights temperature
- review tip 3d printing pen
So Now Im Going To Go Ahead
and just feed that up. Real quick too ok so now It’s kicking out the rest of the blue, but it’s now turned over to put it so that is how you use one of these 3-d pens. I think it’s pretty fun. I’ll have to play around with it to make some cool little designs thanks so much for watching.
Summary
The 3D printing pen comes with three different colors of filament and each one of the filaments is 10 grams per loop . The temperature can be set between 100 and 62 230 degrees . You can adjust the speed of it right along here to get to the speed that you want the filament to come out the end and then on this side.& You have the adjusters there so you can actually feed the wire coming out or to have it.& If you want to remove it from the pan.& Then on the back side, you have the place where the wire goes into so that is the wire.& I do like that as you notice I’m doing this over a paper towel. I don’t want it sticking to any of my surfaces and what you need to do now is select the temperature that you . want it out by simply sliding this forward or backwards and then you can feed it. & Then you also get your instruction guide on how to use everything so the destruction guides very very good…. Click here to read more and watch the full video