Video Creator’s Channel Potent Printables
I Wanted To Make A Step-By-Step Tutorial
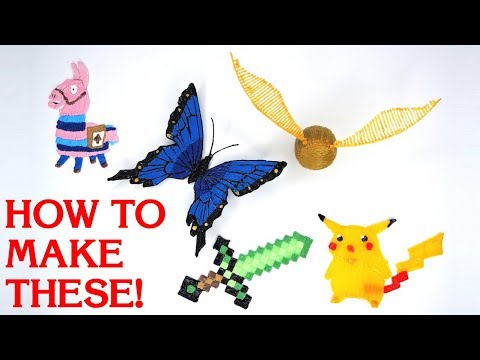
for three pen beginners on how to make some fun three pen art. These are the five models. I’m going to show you how to make in this video there’ll be a time-lapse of me making each of these are also narrating so that I can highlight the important parts and give you tips. I won’t be doing any smoothing or other advanced techniques. I really want beginners to be able to follow what I show.
Each Of These 3D Pen Creations
uses a template or stencil to help make them. In the video description. I’ve put links to all five of the stencils that I used. I’m also gonna be using many of the basic techniques talked about my general 3d pen tutorial videos so click here. If you want to watch those first so you have all the basics down before.
Anything Lets Now Talk About The
few supplies you’ll need before getting started. I tried to keep the amount of supplies you’ll need to a minimum so what you’ll need is a variety of different filament colors. If you want to make these objects in full color. The best way to get all the colors you need is to buy a sample pack of UK. I found simple packs to be a great value for getting a lot of different colors without spending a ton of money.
- stencils
- beginners
- stencil
- tutorial
- drawing
Of Course You Dont Have To Use
all these different colors, but things come out a lot better. If you do for the Golden Snitch I use these cheap styrofoam balls to pan over to get a nice round shape. I also use blue painters tape which can get the hardware store, wax paper simple fingernail clippers for trimming, some super glue and. Finally, the stencils and templates I mentioned earlier links to most of the supplies I used are in the video description. Let’s now jump into making the first model the first models going to be a Minecraft sword special shout-out to 3doodler for having these awesome templates available for free on their website.
I Put Some Wax Paper Down Over
the template and I’m starting out with black colored filament. This model involves a lot of different color changes and that’s probably the hardest part about it. You’re removing all the little strings of filament that are left over sometimes after you pen here. I’m doing a color change, which involves purging out all the old material to make sure that there’s no color bleed through I’m just moving through and filling in the dark green colored squares. Now you’ll see that a lot of times I’m picking away the.
And Thats Just Removing Filament Thats Weeping
through that can make it hard to make clean lines and features. You can also see that if I’m not happy with how a feature starts. I’ll often peel it off and just try again here’s a different way of making these features on the other side of the sword which I felt worked a little bit better using the light brown wood filament on to the dark brown filament and you can see that after I finished a square. I’m often patting it with my finger that’s to make sure that it presses down and adheres to the wax paper and to the adjacent filament For this set of Center features I’m trying to ensure that the tips of the squares touch so that everything is held in place well for the final color. I’m just moving down a line and trying.
To Make Sure There Are No Gaps
Wax paper I run the fan over it to make sure that it’s cooled down and easier to remove from the paper if you don’t use wax paper I found that the model can stick badly to the white paper and be very difficult to remove. I’m using nail clippers to remove some of the stringy leftover filament and to sharpen up some of the edges. I usually do this using flush cutters, but I wanted to keep the tools very simple for this tutorial and here’s the final product. I thought the call was blended really well together and it was very straightforward to make let’s now move on to the next model and make ourselves a surprise. Pikachu I’m doing this the same as the Minecraft sword, where I make all the features of one color to minimize the number of.
Filament Changes Im Doing These Are Two
quick small features the chin and the belly now I’m starting in on drawing the main outer profile of the Pikachu. You’ll notice that I usually draw the perimeter of something and then end up filling it in. This is filling in the years pay attention to the direction that I’m applying the filament. The reason I mentioned director change it for different body parts or features that you’re working on and this can help highlight those body parts or features even if they’re made of the same color filament to finish out the main body. It’s mostly about making long smooth lines, so that the body looks as clean as possible and the tails finished up in a similar manner notice.
Im Keeping The Direction Consistent Now Were Getting
into some of the smaller details. I’m applying the white eyeballs. I’m definitely. Using a very slow speed setting for this these small black feet be tricky again a slow-speed setting is key. I also know that I can trim up the tips of the ears with the nail clippers, so I’m not too worried if I add a little bit too much film in here I’m not going to add in some to help him stand up and I do that by placing the model vertically onto the wax paper and then free handing some feet in place.
The Final Step Is To Apply The Tail
and since this is on the back you can apply a lot of filament to hold it in place and here he is our finished surprise. Pikachu. The next model is going to be the iconic 3d pen to butterfly. This stencil is another 3doodler one but I’ve drawn on some additional guidelines in pencil to. Recreate this Blue Morpho butterfly for the center body.
I Pulled It Up Layer By Layer Moving
in a little bit each time to give it a rounded shape and I add the eyes to the center body next time. Move on to Trey the outer profile of the wings. After finishing the outer profile. I feel on the inner lines of the wing don’t worry. If you have some blobs here, they get hidden when you use color filament to fill in the wings.
This Is Ensuring Everything Is Cooled Down And
removing all the excess stringing material moving. This extra material is important because it allows you to cleanly apply the colorful woman. You try to match the coloring of the Blue. Morpho Butterfly I’m using the dark blue filament on the inner segments of the wing. I’m making the edge of the blue filament a bit jagged.
- stencil help make
- 3d pen tutorial videos click
- 3d pen creations uses
- stencils templates mentioned
- step step tutorial pen beginners
To Better Blend The Colors Together
on to heading the lighter blue filament and I’m again, leaving a jagged edge for the light blue to black filament transition. This is adding the gold dots at the edge of the wings. You can see that I apply a bead of gold filament and then press it down with my finger here. I’m adding the black filament around the gold dots. I’m using a slower speed setting on the pen to ensure that I don’t bleed over the gold dots.
Were Getting Close To The End
and now it’s time to add in some of the final details like the antennas. Attaching the wings to the main body without additional tools is harder, but it can be done as I show here the tool I would use would be some tack adhesive putty to hold the main body in place. You can. See I use this in a lot of my other videos. The final step is to attach the antennas using a little bit of superglue.
I Think This Came Out Really Well And
it was surprisingly easy. You should definitely give it a try all right. Let’s move on I make the loot Lama from fortnight the older I’m making some of these features may seem a little weird at first, but it should make sense shortly my plan is to make the arrow and piece of paper separately so that I can really refine their shape and then glue them on At the end it’s really tough to get the sharp corners of the arrow when just using the patent. So by making it separately and using the nail clippers I can get the shape I want and here’s the piece of paper which again I’m going to glue. On at the end, the eyeball is not going to be a separate piece, but I make it first so I can get the shape nice and round for the bag.
Im Using A Light Brown Wood-Colored Filament.
I’m yet again uses the technique of applying the filament in different directions to give the object some depth and different textures and their call and applying the halter and the hooves with the hose. I know that I can trim and sharpen them up using the nail clippers. The legs are in the first of three blues and nothing tricky about them. This is the lightest of the blue colors and we’re applying the stripes across the llama You’d want nice consistent strokes with no blobs.
The The Same Goes For Applying
the dark blue stripes for the main pink color. I follow the same pattern as the other models where I tries to help the outline of a lot of the main features. I’m filling in these outlines and applying the filament in different directions For different features are you sensing a pattern here. While this looks like a no time at all. When I do a bunch of jump cuts like this here’s a little bit of removing some of the extra strings and trimming of some features within ill Clippers.
Here.
I’m planning out some of the fine features that I’m actually going to draw on using a black sharpie. There’s no way I could make these fine Peter’s using a 3d pen, so Don’t be afraid to use markers like this to draw on some of these delicate features on your models. I.
Wasnt Satisfied With The Way The
ears came out So I’m actually using the pencil to darken. Some of the transition areas okay so I’ve already glued on the piece of paper, but now I’m gonna glue on the arrow as the final touch whoops did I say final touch I forgot some of the dark blue stripe and here’s your finished llama so the final model we’re gonna do is the Golden Snitch from Harry Potter. This model seems really simple, but I think it’s actually poking into intermediate territory. I still left it in here to challenge you all a little bit, so it’ll be afraid to push yourself.
Using This Small Styrofoam Ball To Make
the main body of the snitch is a main part of this model, appointing the blue painters Tape makes the filament stick better and not melt the styrofoam once the balls covered. In blue painters tape I smooth it out to make it easier to pen over I’m adding these guidelines to help when applying the filament because often it’s hard to know where you’re at on the round object. Now I’ll apply in the gold filament to the ball and I’m using the guidelines to set how long my strokes are, even though this footage is sped up.
Summary
I wanted to make a step-by-step tutorial for three pen beginners on how to make some fun three pen art . Each of these 3d pen creations uses a template or stencil to help make them . The best way to get all the colors you need is to buy a sample pack of UK. UK.& I found simple packs to be a great value for getting a lot of different colors without spending a ton of money . I also use blue painters tape which can get the hardware store, wax paper simple fingernail clippers for trimming, some super glue and super glue . For the Golden Snitch I use these cheap styrofoam balls to pan over to get a nice round shape. For the . Golden . Snitch, you don’t have to use all these different colors, but things come out a lot better, but it comes out a . lot better.& If you do for the . golden snitch I used these cheap syroffam balls…. Click here to read more and watch the full video